Dana Simmons is a professional audio engineer and technology consultant and dabbles in instrument invention, synthesizer construction and other experimental music and technology related projects. Here he rambles about his recent projects and such.
Wednesday, December 16, 2009
War of the Worlds: A Radio Re-enactment
In tribute to creative content being broadcast on the radio at large. I gathered together a group of friends to revisit the radio drama of ole'. The drama of choice? The classic "War of the Worlds" in abridged form. Our antics are included bellow in recorded mp3 form.
War of the Worlds [abridged]
Enjoy!
Saturday, October 3, 2009
Controlling Ardour and Jackd through OSC and Python
OSC, or Open Sound Control, is a flexible network messaging system intented to allow the control of various music and sound oriented software. There are several mature applications that currently support external control via OSC. These apps include Jamin, Ardour, and Jack. In this post, I'd like to concentrate on controlling Ardour and Jack through Python using OSC.
Ardour has a little known set of OSC messages that it can understand. Oddly enough, this set is vaugly documented in the Supercolider wiki. The messages currently implemented (As of this writing the latest stable version of ardour is 2.8.2) controll basic channel routing functions and simple transport operations (Mute/Solo/Rec Arm, Stop/Play/Punch In). So without the use of any external software we have a basic control of Ardour which can be extended to external interfaces (think midi controllers for Ardour!).
Thanks to a small python module called Simple OSC, it is possible to send, recieve and manipulate OSC messages within Python. We will use python to glue all this stuff together and actually do something interesting.
Unfortunately, Ardour only offers rudimentary control of its transport mechanism over OSC. Which means we mush use some other means to locate the playhead to specific locations and get current time line/meter/tempo information. This is where a little app called jack.clock (or jack.osc) which is a member of the jack-tools package.
The bellow python code is about as simple as it gets, this module will allow a user to play and stop ardour through osc, as well as enter timecode locations (in seconds)
import osc
osc.init() #Initialize the OSC module
def play():
#Send a play message to ardour, there is no additional information required for this
#Hence the empty list!
try:osc.sendMsg('/ardour/transport_play',[],'localhost',3819)
except: raise
def stop():
#Send a stop message to ardour, there is also no additional info for this message
#Hence the empty list!
try:osc.sendMsg('/ardour/transport_stop',[],'localhost',3819)
except: raise
def locate(loc):
#This message requires that there is a jack.clock instance running at port 9001
#jack.clock is a member of the jack-tools package and controls the jackd timeline
try:osc.sendMsg('/jck_rl',[loc],'localhost',9001)
except: raise
Tuesday, September 15, 2009
Quick, Automated, Incremental backup with rsync and ssh.
Working in the multimedia field. I live and die by data management. It's easy to be a little to quick with the delete key. Even with the best data organization strategies, it's all for nothing when a drive fails. This is why i've set our in search of a reliable way to incrementally backup my data.
A few months back I posted a little app that I wrote using rsync and ssh that would backup all my portable media overnight when it got left plugged in. I've since found that data o cumulates very quickly without some sort of incremental organization.
Fortunately, my backup server uses a file system (ext3) which supports hard file links. Hard links make incremental backups very simple to manage as copies of the same file do not occupy additional space. After a little research, if found that with a little rsync and ssh magic, a very simple and efficient backup archive can be built.
Firstly, we have to backup something remotely. I place the most recent backup copies in a "current" folder. Also, notice bellow that the --delete switch is used in the rsync command, this will remove files that no longer exist. That may seem like a bad thing, but i'll show you how this is actually good and helps in the incremental backup scheme.
Now if all we did was run this command. At best, we would just end up with a direct copy of our data, which isn't really much of a backup. But if we then make a hard-linked copy of the 'current' folder and rename it to be asociated with the date the backup was made, we quickly get an incremental backup of our data. This copy can be executed directly after the rsync job has finished.
The -rl switch ensures that directories are copied and that all of the copies should be hard linked, which means that new copies will not occupy additional disk space.
Since bash, python and ssh come installed by default on OS X, this method of backup can also work wonders for the Mac crowd. And for windows
A few months back I posted a little app that I wrote using rsync and ssh that would backup all my portable media overnight when it got left plugged in. I've since found that data o cumulates very quickly without some sort of incremental organization.
Fortunately, my backup server uses a file system (ext3) which supports hard file links. Hard links make incremental backups very simple to manage as copies of the same file do not occupy additional space. After a little research, if found that with a little rsync and ssh magic, a very simple and efficient backup archive can be built.
Firstly, we have to backup something remotely. I place the most recent backup copies in a "current" folder. Also, notice bellow that the --delete switch is used in the rsync command, this will remove files that no longer exist. That may seem like a bad thing, but i'll show you how this is actually good and helps in the incremental backup scheme.
#Backup remotely using rsync and ssh
rsync -avx --delete /home/Dana/ server.home:/backup/dir/current -e ssh
Now if all we did was run this command. At best, we would just end up with a direct copy of our data, which isn't really much of a backup. But if we then make a hard-linked copy of the 'current' folder and rename it to be asociated with the date the backup was made, we quickly get an incremental backup of our data. This copy can be executed directly after the rsync job has finished.
#copy and rename the current folder
ssh server.home cp -rl /backup/dir/current /backup/dir/`date +%Y-%m-%d`
The -rl switch ensures that directories are copied and that all of the copies should be hard linked, which means that new copies will not occupy additional disk space.
Since bash, python and ssh come installed by default on OS X, this method of backup can also work wonders for the Mac crowd. And for windows
Monday, August 31, 2009
Is twitter taking over? I think not!
This past month as been jam packed with stuff for me: Moving, settling into the new digs, painting, wiring for a network, four classes at school, developing software for work, moding my dumpster destined x-box, finishing Out of Control, pre-pro for a new short? etc.
So chances are, if you've talked to me during the past month, you know a little about whats been going on. So this post, I want anyone who is at all curious about anything I may have mentioned in a conversation together to request that I write a post explaining in more detail the (mis)adventures in tech i've experienced as of late.
Post a comment with your request, send me an email or just ask me in person. And if no one makes a request, then that is simply that much less writing I will have to do. (But you really should make a request) I leave you all with the video bellow. Don't try this at home kids! Oh, and of course, you can keep up with my many blurbs of thought and text on twitter @dcsim0n
Pyro Cannon Test from Kevin Wilson on Vimeo.
Wednesday, July 8, 2009
Rebuilding a studio: Adding Gear
Day two and three of the studio rebuild consisted mostly of placing the gear into the racks and wiring everything up after all the snakes and looms had been run and prepped. The layout of the outboard gear is crucial. By grouping similar gear together one can simplify the usage of looms and snakes. For example, by dedicating one rack to dynamics. A single snake can be dedicated to dynamics and run directly to the rack instead of stretching fan-outs between racks and running extensions and such. Also, it is very important to realize how much heat certain gear generates. Typically, any gear with tube based circuitry will generate a fair amount of heat, along with any high voltage speaker amplifiers. For this type of equipment is is crucial that there be at least 1U of space above for adequate ventilation. Heat can build up quickly and is most harmful to sensitive (and expensive) equipment.
A DL termination on a snake, DL connectors are unique in that they are "zero insertion force" connectors. Meaning that the pins do not wear out from frequent use.
A rack of pre-amps and processing. Notice the 1U spaces between some of the gear for ventilation and cooling.
This is a fan-out, or sometimes just called a fan or breakout. This fan terminates a DL snake into 1/4" TRS connectors for connecting to outboard gear (In this case, for headphone monitor sends).
Rebuilding a studio: Wiring the rack
I've been helping out in the studios at Ai to rebuild the racks of gear and simplify/tame the many snakes, looms, and rat nests of cable. Here are some pics from Day One, you see the many fans of cable have been lain out on the floor for more work room inside the rack. The ultimate goal here is to keep all of the looms out of the floor from in front of and from behind the rack. The solution? We run all the cable under the rack, bringing the DL looms out from under in the back to mate with the fannouts for connecting to the gear.
Wednesday, June 10, 2009
DIY Condenser Electret Mic
For recording enthusiasts and diyers everywhere, there is DiyCondenserMics.com.
Overview:
Overview:
If you're not afraid of a soldering iron, you can actually build a +48v phantom powered studio condenser mic, for fairly cheap. Most, if not all of the parts can be found at your local Radio Shack. The only thing you really need to find, or make your self, would be the mic body. People have come up with all kinds of ideas for mic bodies. From old flash lights, to pluming parts, to Altoids tins.
The site features build pics, schematics, and construction plans as well as a forum for sharing ideas and other treatsies.
P.S: The move into the new place is going well. ethernet is going in this week, painting is ongoing and a true transformation can be expected in the near future. Pictures to come soon!
Sunday, May 10, 2009
Cable Management: The boy-scout way
Lifehacker recently featured an article on how to tie cables using a continuous piece of twine or rope. In my opinion this sure beats buying bunches of cable ties and zip ties. This method is also a whole heck of alot more flexible as well (no cutting and using fresh zip ties). It also brings out the ub3r boy scout side of me.
Wireing and Cabling: How To Lace Cable Harnesses
Wednesday, April 22, 2009
Location Re-Location
After spending a little over one and a half years in my current apartment. I seem to have outgrown the renters lifestyle. Several of my friends and I have gone in together to purchase a house of our own. I'll be packing up my belongings within the next few months and moving into the new digs. I expect to have room to expand my workshop and office areas. This can only mean that there are many fun projects to come. In fact, I'm already postponing the construction of several treatises until after I settle into the new place. So here's to new beginnings. I hope to be moved in and ready to rock by the time I write my next post.
P.S.
If there so happens to be anyone in the North-Atlanta area looking for a place to stay, I am in need of someone to sub-lease my current apartment until the end of the year.
Tuesday, March 3, 2009
Latest Build: Sound Lab Mini Synthesizer
I recently got around to building a project I've been longing to try for quite a while now. I ran across Ray Wilson's website: Music from Outer Space. The Sound Lab imeadtiatley cought my attention.
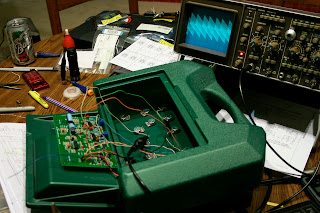
In my search for a suitable enclosure I ran across a K-NEX box in a thrift store, complete with bags of K-NEX pieces, gears and wheels, perfect for front panel knobs. For $3, this case and collection of knobs blows the typical $30 tab for pre-fab eclosures and molded plastic knobs out of the water.
I've included some of my build pictures. Hope you enjoy, samples coming soon.
I've been planning this build for a while and last week, I finally had everything I needed to get started.
The P.C. board, almost complete.
Inside view of the case. This is barely half the amount of wires in the finished product.
Preliminary tests of the oscillators, working well!
The box, with pots mounted, switches coming soon.
Monday, March 2, 2009
Monday, February 2, 2009
New Years Resolution: Removable Media Backup
Removable and portable media, I've found, is one of the toughest things to make consistent backup copies of. After all, there is really no way to predict when and/or where my multitude of drives will be plugged in. Which led me to a simple solution, back them up when they are plugged in.
In the past, I've used rsync to make backups on a regular basis (using cron jobs). I devised a similar scheme to backup removable media.
A simple python script scans for mounted media. Drives that have been configured to be backed up are copied through rsync and ssh to the specified backup location. Drives/media not configured for backup are simply ignored.
The script looks for a two line text file in the root directory of each mounted drive to designate whether or not to backup the drive. The text file contains the volume's name (not to be confused with the portion label, this name is only for aesthetics and organization) and also the location the drive should be copied to on a remote host. The script then continues to archive the drive to the location specified. When done, it moves on to the next drive and so on.
The script and example config file are included in a tarball below. Comments and improvements welcome.
Download the Drive Booty script [Box.net link]
DriveBooty by Dana Simmons is licensed under a Creative Commons Attribution-Share Alike 3.0 United States License.
Sunday, January 4, 2009
Arduino Control Voltage: Rough Code
I've worked a little more on the Arduino Control Voltage. The processing code bellow takes midi input from any midi device, reads the note and velocity information and then spits it back out over the USB Serial connection to the Arduino board. It's a roundabout convoluted way of getting midi information (midi being a serial data stream to begin with), I hope to get a direct midi input wired up soon.
Arduino PWM to CV out circuit
Bellow is the (now) simple code to be uploaded to the Arduino board which just reads the serial data and controls the PWM output.
Arduino Control Voltage by Dana Simmons is licensed under a Creative Commons Attribution-Share Alike 3.0 United States License.
Based on a work at code.google.com.
Arduino PWM to CV out circuit
import promidi.*;
import processing.serial.*;
int com = 0; //Comport/Serial port #
MidiIO midiIO;
Serial sOut;
PFont font;
int pit;
int vel;
void setup(){
font = loadFont("ArialMT-40.vlw");
midiIO = MidiIO.getInstance(this);
println(Serial.list());
midiIO.printDevices();
midiIO.plug(this,"getMidi",0,0);
sOut = new Serial(this, Serial.list()[com], 9600);
}
void draw(){
background(255,255,255);
textFont(font,15);
fill(0,0,0);
text("Midi Data",0,14);
textFont(font,12);
text("Note:",0,28);
text("Velo:",0,42);
textFont(font,12);
text(pit,42,28);
text(vel,42,42);
}
void getMidi(Note note){
println("Got a note!");
vel = note.getVelocity();
pit = note.getPitch();
println(vel);
//println(pit);
sOut.write(vel);
sOut.write(pit);
}
Bellow is the (now) simple code to be uploaded to the Arduino board which just reads the serial data and controls the PWM output.
/*Arduino CV. Reads note and velocity information form the serial line and outputs to PWM pin */
byte note = 0;
byte vel = 0;
int synPin = 11; //Pin # for pitch CV output
void setup() {
Serial.begin(9600);
}
void loop() {
if(Serial.available() >= 2 ){ //Wait untill there is enough information
Serial.println(Serial.available(),DEC);
vel = Serial.read(); //FIX ME: Implement velocity sensitivity (VCA Control)
note= Serial.read();
analogWrite(synPin,note);
}
}
Arduino Control Voltage by Dana Simmons is licensed under a Creative Commons Attribution-Share Alike 3.0 United States License.
Based on a work at code.google.com.
Subscribe to:
Posts (Atom)